Bootcamp For Mac Faq
Explore the frequently asked questions about UCF Boot Camps offered in Orlando and Sanford/Lake Mary. Yes, a reliable laptop is required for this course. Laptops can be Mac or PC, with a minimum 8GB of RAM and a dual core processor. If you’re interested in partnering with our bootcamp or accessing our student portal. Here's what you need to know, in detail, about Apple's Boot Camp and running Windows on Mac hardware.
For a printer friendly. Boot Camp Things Needed for Boot Camp: 1. Copy of Windows Vista (Only Home, Home Premium, Business, and Ultimate will work ). Vista Home Basic SP1 Vista Home Premium Vista Business Vista Ultimate All versions of Vista used with Boot Camp have to be full versions.
OEM and Upgrade versions violate Microsoft’s license agreement and cannot be used. OS X Leopard disk.
This will be needed to install Mac drivers if Vista does not install all the drivers needed. At least 10 GBs free on the hard drive. For Vista it is recommend that you use at least 20 GBs free.
All the updates for everything installed on the machine. Things to Keep In Mind before Starting the Process: 1. It will take at least an hour to complete the process but it may take up to 5 hours to complete the whole process. It’s a good idea to backup everything on the machine with Time machine just in case something does go wrong. If you have used your machine heavily before starting boot camp the system files may be scattered around the drive. This will cause an error and you won’t be able to start boot camp.
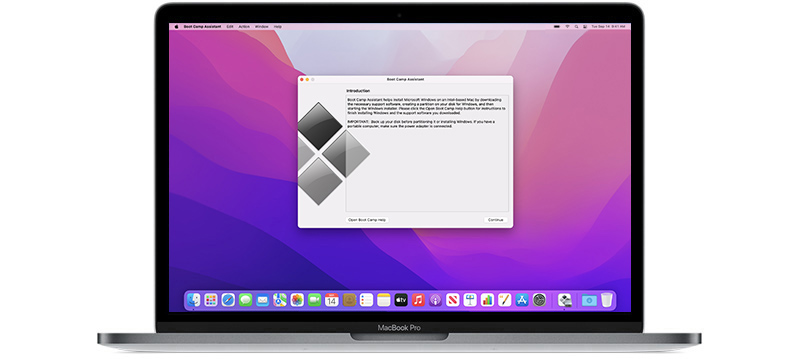
A simple fix for it is to run a defrag on the system. Apple does not provide a defrag tool so you will have to either purchase one or try to find a free defrag tool. Here are some tools that can be used: iDefrag OnyX DiskWarrior Drive Genius 2 Process for Installing Boot Camp Step 1: Run Boot Camp Assistant Boot Camp Assistant helps you create a new partition for Windows and gets you started with the Windows installation. Important: If you are using a portable computer, connect the power adapter before continuing. To use Boot Camp Assistant: 1. Log in to an administrator account on your computer, quit all open applications, and log out any other users on your computer.
Open Boot Camp Assistant (located in /Applications/Utilities/) and follow the onscreen instructions. Creating a Partition for Windows Boot Camp Assistant helps you create a new partition for Windows on an internal disk.The assistant dynamically partitions your startup disk, creating a new partition for Windows without erasing your existing Mac OS X system. If you have a computer with multiple internal disks, you can create a second partition on any of those disks or use an entire disk for Windows. When you create the Windows partition, you can choose to use 32 GB, use half of the disk for Windows, or set a custom size. The Windows partition must be at least 5 GB and leave at least 5 GB of free space on the Mac OS X partition.
To create a partition for Windows: 1. Set the size of your Windows partition.
HyperEngine-AV is a free video editing software for Mac used to capture, edit, organize process, and export video, audio, and text to create DVD quality movies and slide shows. It comes with twelve studio-quality effects from Arboretum's Hyperprism suite of audio processors. Simple video editing software for mac for lyric video.
Refer to your Windows installer documentation to help you determine the best partition size for your system. Windows Vista requires more disk space than Windows XP. Click Partition. Boot Camp Assistant creates the new Windows partition. Your original Mac OS partition, with all your software and information, remains intact.
You can use Boot Camp Assistant later to remove the partition if you want to restore the disk to a single-partition Mac OS X volume. Creating a Partition on a Computer with Multiple Internal Disks If you are installing Windows on a computer with more than one internal disk, select which disk to partition for Windows. You can:. create a second partition for Windows on any internal disk. erase a non-startup disk and create a single partition for Windows If you have already partitioned a disk, you can restore it to a single Mac OS X partition. In the 'Create or Remove a Windows Partition' window, select a disk to see the options available for that disk.
Step 2: Install Windows Read and follow these instructions for installing Windows on your Mac computer. Refer to your Windows documentation for general information about installing and setting up Windows. Important: Unless you’re using a portable computer, you’ll need a USB keyboard and mouse during installation.
Important: If your computer doesn’t have a built-in optical disc drive, you must install Windows and Windows drivers using a compatible external optical drive. You can install any of the following versions of Windows:. Windows XP Home Edition or Professional. Windows Vista Home Basic, Home Premium, Business, or Ultimate Important: You must use a single full-install Windows installation disc (Service Pack 2 or later is required for Windows XP installations). Do not install an earlier version of Windows XP and attempt to update it later to SP2. To install Windows on your Mac computer: 1.
If you already quit Boot Camp Assistant without installing Windows: a. Open Boot Camp Assistant. Select 'Start the Windows installer.' Click Continue.
If you are using a computer with more than one internal disk, select the disk on which you want to install Windows, and then click Continue. Insert your Windows installation disc. In Boot Camp Assistant, click Start Installation. Your computer starts up from the Windows installation disc. Follow the onscreen instructions. Refer to the following sections for more information.
Selecting the Windows Partition It is very important to select the correct partition when installing Windows so that you don’t overwrite Mac OS X on your computer. NOTICE: Do not create or delete a partition, or select any partition other than as noted below.
Doing so may delete the entire contents of your Mac OS X partition. To select the correct partition for Windows Vista:.
Select 'Disk 0 Partition 3 BOOTCAMP. Formatting the Windows Partition Even though Boot Camp pre-formats the Windows partition, this partition can’t be used to boot the computer. You must reformat the new Windows partition using the Windows installer.
To format the partition for Windows Vista: 1. Click 'Drive options (advanced).' Click Format, and then click OK. The Windows Vista partition is formatted using the NTFS file system. Setting Up Windows After you install the Windows software, your computer automatically restarts using Windows. Use the Windows setup screens to configure Windows. Step 3: Install the Boot Camp Drivers for Windows After installing Windows, install Mac-specific drivers and other software for Windows using your Mac OS X Leopard installation disc.
The Mac OS X disc installs drivers to support Mac components, such as:. graphics. networking. audio. AirPort wireless connectivity.
Bluetooth®. Built-in iSight camera (external iSight cameras aren’t supported).
Apple keyboards. Apple Remote. brightness control for built-in displays The Mac OS X disc also installs the Boot Camp control panel for Windows and the Apple Boot Camp system tray item. To install the Boot Camp drivers: 1. Eject the Windows installation disc. Go to My Computer. Select the optical drive (D:).
Click 'Eject this disk' in the System Tasks list. Insert the Mac OS X disc. If the installer doesn’t start automatically, browse the disc using Windows Explorer and double-click the setup.exe file in the Boot Camp directory. Follow the onscreen instructions. If a message appears that says the software you are installing has not passed Windows Logo testing, click Continue Anyway.
Windows that appear only briefly during the installation don’t require your input. If nothing appears to be happening, there may be a hidden window that you must respond to. Check the taskbar and look behind open windows. Important: Do not click the Cancel button in any of the installer dialogs. After your computer restarts, follow the instructions in the Found New Hardware Wizard to update your software drivers (Windows XP only). Follow the instructions for any other wizards that appear.
Note: Periodically, Apple may provide updated Boot Camp drivers, which you can download and install using Apple Software Update. To check for updated drivers manually, go to.
Starting Up Using Mac OS X or Windows Once you’ve installed Windows and the Boot Camp drivers, you can start using Windows on your Mac. Boot Camp makes it easy to start up your computer using either Mac OS X or Windows.
You can set the default operating system for your computer using Startup Disk preferences (Mac OS X) or the Boot Camp control panel (Windows). You can also select an operating system as your computer is starting up.
Setting the Default Operating System You can use the Startup Disk pane of System Preferences in Mac OS X to set the default operating system for starting up your computer. Boot Camp also installs a Boot Camp control panel that lets you set the default operating system when you’re running Windows. To set the default operating system in Mac OS X: 1.
In Mac OS X, choose Apple System Preferences. Click Startup Disk.
Select the startup disk with the operating system you want to use by default. If you want to start up that operating system now, click Restart.
To set the default operating system in Windows: 1. In Windows, click the Boot Camp system tray item and choose Boot Camp Control Panel. Note: Your screen may look different, depending on which computer you’re using. Select the startup disk with the operating system you want to use by default. If you want to start up that operating system now, click Restart. To restart in Mac OS X using the Boot Camp system tray item:.
In Windows, choose 'Restart in Mac OS X' from the Boot Camp system tray item. Restarting in Mac OS X using the Boot Camp system tray item also sets the default operating system to Mac OS X.
Selecting an Operating System During Startup You can select which operating system to use during startup by holding down the Option key. This displays icons for all available startup disks, and lets you override the default setting for the startup disk in Startup Disk preferences (Mac OS X) or the Boot Camp control panel (Windows) without changing that setting. To select an operating system during startup: 1. Restart your computer and hold down the Option key until disk icons appear onscreen.
Select the startup disk with the operating system you want to use, and then click the arrow beneath the icon.
I need to install windows 10 on my 128GB Drive but Im stuck. I really hope you guys can help me. My Mac is a 4.1 5.1 Mac Pro with a 250GB SSD Drive via a PCI-e adapter and a 128GB (NTFS formatted) in the optical bay for Windows. I followed this guide to create a USB installer on a Mac Pro (normaly you have to use the superdrive on Mac Pro) (scroll down to see the Mac Pro version of the guide) So after the Bootcamp Assistent part I boot up from the USB and get to the installer and when I choose my 128GB NTFS drive I get this message: We Could create a new portion or locate an existing one etc. I tried everything from the similar post I found, removing other usb drives, PRAM reset, my USB thumb is a 2.0 and not 3.0 I also tried to format the drive in the windows installer. I also read this thread with no luck And this one When I click on the 'X' my Mac just restarts, It dont go back to the initial setup screen.
Im thinking about getting a Windows 7 or 8 DVD and try to install via Superdrive. I don't think BootCamp Assistant is really necessary if you are installing Windows to its own drive. As far as I know, all it does is the special partitioning stuff (which you don't need if you are using a separate drive) and preps a driver disk (which you also don't need if you will have an Internet connection in Windows). When I installed Windows, I just pulled all the other drives out (leaving the drive intended for Windows), and used the Windows installer to install directly on that drive.
Then after booting up Windows I installed the BootCamp drivers. Click to expand.Sure it's possible, more than one member successfully did that. However, compare to the disc method. It's much harder to get the installer prepared and work properly. And I totally agree that OP should completely bypass bootcamp assistant for UEFI Windows installation.
The bootcamp assistant never designed to use in this particular case (Install UEFI Windows on a separated hard drive). Other than cMP, no other Mac can officially install one more extra internal hard drive for Windows only. And cMP never officially supported to install UEFI Windows (via bootcamp assistant). If you hack the bootcamp assistant to let it treat the cMP like the newer Mac.
It may only able to install UEFI Windows (via USB drive) on the macOS drive (via creating partition, like all the newer Mac). I can't see why bootcamp assistant has the function to prepare an independent hard drive correctly for UEFI Windows installation. No such Mac ever officially exist. I couldn't install Windows 10 or 8 on Mac Pro 2012 High Sierra. So I installed Windows 7 and upgraded to Windows 10. These steps worked for me. Download Windows 7 and burn the ISO to DVD.
Boot Camp on my Mac Pro 5,1 won't work with anything else but a DVD of Windows. Remove all cards that might not be supported in Windows 7 (I removed a new GPU and reinstalled the stock 5770) 3. If you have MacOS installed on a RAID, Boot Camp won't partition or install on it.
Use one physical drive with MacOS installed that can be partitioned with at least 30+GB for Windows. Use Disk Utility to format a 8+GB USB thumb drive to MS-DOS (FAT) (Boot Camp didn't work with an external USB SSD drive) 5. Mount the USB drive and Windows DVD you created 6. Run Bootcamp Assistant and check both options to download the latest Windows support software and install Windows 7. Your Mac will reboot and install Windows. When the installer asks for which partition, format the BOOT CAMP partition and select the partition to install Windows.
Once Windows 7 is installed, download the Windows 10 Creation Tool from. Run it to upgrade to Windows 10. You need a valid Windows serial number at this stage. Perform an update to install the latest Windows 10 updates. Launch Apple Software Update and install the latest Apple support software.
For whatever reason, I couldn't find the Apple Software Update. The workaround is to install Windows iTunes, which also installs Apple Software Update.
Lastly, power off and put all your cards back in the Mac, restart Windows, and install any Windows drivers needed for the cards. Despite Windows 10 working perfectly, Boot Camp manager in Windows is missing, so I can't switch startup disk from Windows.
Holding the option on startup also doesn't work, the startup Disk Manager screen doesn't show up. My workaround is resetting the NVRAM on start up to boot up MacOS. UPDATE: Thanks to the wisdom of several users on this topic, I successfully installed Bootcamp drivers and now Boot Camp Control Panel/manager appears in the Windows Taskbar tray.
In step #10 above, Apple Software Update will not install all Windows 10 drivers needed for the Mac Pro 5,1 due to Apple's lack of support for Windows 10 in the old Mac. What you will need to do after running Apple Software Update is find and download Boot Camp version 6 (it's not on Apple's website). Uncompress it, use Windows Command Prompt as an administrator to launch the Boot camp installer and bypass Apple's restriction. Here's a detailed video tutorial by Hrutkay Mods. I couldn't install Windows 10 or 8 on Mac Pro 2012 High Sierra. So I installed Windows 7 and upgraded to Windows 10.
These steps worked for me. Download Windows 7 and burn the ISO to DVD. Boot Camp on my Mac Pro 5,1 won't work with anything else but a DVD of Windows. Remove all cards that might not be supported in Windows 7 (I removed a new GPU and reinstalled the stock 5770) 3. If you have MacOS installed on a RAID, Boot Camp won't partition or install on it.
Use one physical drive with MacOS installed that can be partitioned with at least 30+GB for Windows. Use Disk Utility to format a 8+GB USB thumb drive to MS-DOS (FAT) (Boot Camp didn't work with an external USB SSD drive) 5. Mount the USB drive and Windows DVD you created 6. Run Bootcamp Assistant and check both options to download the latest Windows support software and install Windows 7. Your Mac will reboot and install Windows. When the installer asks for which partition, format the BOOT CAMP partition and select the partition to install Windows. Once Windows 7 is installed, download the Windows 10 Creation Tool from.
Run it to upgrade to Windows 10. You need a valid Windows serial number at this stage.
Perform an update to install the latest Windows 10 updates. Launch Apple Software Update and install the latest Apple support software. For whatever reason, I couldn't find the Apple Software Update. The workaround is to install Windows iTunes, which also installs Apple Software Update. Lastly, power off and put all your cards back in the Mac, restart Windows, and install any Windows drivers needed for the cards.
Despite Windows 10 working perfectly, Boot Camp manager in Windows is missing, so I can't switch startup disk from Windows. Holding the option on startup also doesn't work, the startup Disk Manager screen doesn't show up. My workaround is resetting the NVRAM on start up to boot up MacOS. I highly suggest you get the software called WinClone (macOS). This software can make an image file from your Windows drive.
So, make your recovery very easy. You can make an image in Winclone right after Windows 10 installation. (a 'Clean' image) If your Windows is killed by the wrong bootcamp driver. Rather than try to fix it, or re-install Windows, you can simply recovery from the image. You can keep using your Mac at the same time (in macOS), no down time.
And once you make one step further (e.g. Successfully install all required driver and bootcamp apps). It's time to make another image file (a 'full version' image). In case Windows update / driver update / virus / whatever kill your Windows, again, recovery from an image file is much much quicker and easier than re-install everything again. I seem to remember people have issues with the specific combination of EFI Windows and EFI 770. The computer is successfully booting up, but the drivers are not active for some reason.
You have two options, either (A) install Windows in CSM/BIOS mode, or (B) install the 770 drivers during 'black screen' via remote computer like so:. Install GT120. Boot into Windows. Set up Remote Desktop, VNC, whatever. Test to make sure you can connect to it from a different computer. Turn off computer, remove GT120, and install 770.
Boot up to black screen. On other computer, connect via Remote Desktop (or VNC, or whatever). Install latest Nvidia drivers. Once the windows installer completes the machine hands off graphics drivers, thus the black screen. Using the latest W10 creation USB and my flashed 780 I ran into this as well. Initially I thought something went wrong and after a few minutes I pressed the power button and allowed the blacked out windows to shut itself down. However upon reboot and giving it a little time the machine installed Geforce Drivers on its own (380.xx) I think.
So, maybe let it run while connected to the internet for a bit. I am still configuring so the real test will come when I install bootcamp and put my unflashed Titan X back in but just food for thought. I think it's possible that you may run into conflicts with the gt120, as its drivers and the modern geforce drivers are incompatible if memory serves.
Construction cost estimating software for mac. We were looking for a leader in the industry that could provide us with a stable software that would be able to meet our daily demands. As one of the largest lumber retail companies in the industry, we always work to stay up with new technology trends to ensure we provide our clients with the most accurate estimate for their construction projects.
Click to expand.Yes, you are correct. But, there is a way to make it work. I run two un-flashed 1080 TI's and one GT-120 (for boot screens). I have a 32' 4k display connected to one 1080 TI and a small 10' display connected to the GT-120. For me to get this combination to work (In Windows 10) I had to 'disable' the GT-120 in Device Manager.
Funny thing is even after 'disabling' the GT-120 graphic card the card still drives the 10' display just fine with basic generic MS drivers. But, disabling the GT-120 keeps Windows from trying to automatically install the WRONG drivers.
Windows always want's to automatically install the drivers of the PC version of the card which is 9500 GT. When this happens it hoses both your GT-120 card and any other Nvidia card drivers you have installed.
They all crash and you get black screens. The old drivers for the GT-120/9500 GT are NOT compatible with any of the newer Nvidia drivers. They cause all nvidia drivers to crash. When you install the Boot Camp drivers Boot Camp installs the old GT-120 Nvidia drivers which are also incompatible with the newer Nvidia drivers which causes the same black screen issues. To avoid this I go into the Boot Camp 'Drivers' folder and delete the Nvidia folder before running the Boot Camp installer.
Then you can install the Boot Camp drivers without causing the issue. After jumping through these hoops all is good. The GT-120 and the 1080 TI's are all working in perfect harmony (macOS & Win 10). Life is bliss. Hope this helps someone because it caused me LOTS of headache and took a good while to figure out.
Click to expand.Thanks for the tip. This worked brilliantly. Bootcamp control panel now appears in the Windows taskbar tray. I downloaded Bootcamp v.6 (direct download not using Boot Camp Assistant, not from Apple) and used Windows Command Prompt as you described to install bootcamp.msi. Apple doesn't support v.6 for cMP 5,1, but Command Prompt can bypass the restriction.
Moral of the story: don't depend on Boot Camp Assistant or Apple Software Update to install drivers for Windows 10 on old Macs. Is this a sticky somewhere on this forum? So after step 5 I boot up with the GTX770 and the screen is still showing. Then I went to install the latest driver ( with remote control via Team viewer ) then when its half way through the screen goes to sleep (when it does the GFX fans are getting louder) and my remote control session from Teamviewer freezes. I tried to close the session and reconnect with the Mac Pro but it docent work, but it says its online, very strange. ( I did set it ud so I can connect without password ) but after a restart of the Mac Pro the screen goes to sleep after the windows start up logo, and Teamviewer says its offline. Maybe I should try to reformat one more time and install all windows updates before the screen goes to sleep.
I also saw this video, maybe I should give it a try.