My Passport Ultra Tb Does This Need To Be Formatted For Mac
Have one to sell? It is also compatible with Apple Time Machine backup software. WD 2TB My Passport Ultra for Mac Silver Portable External Hard Drive. Formatted for Mac - HFS+ Journaled so it works right out of the box with your.
External hard drives and external solid state drives come pre-formatted and ready for use. Internal HDD and internal SSD drives do not ship pre-formatted and will need to be Partitioned and formatted before being used.
Please note the instructions do not differ when formatting different capacity sizes, this is not capacity specific.
| Critical: The instructions in the article below are designed to help repartition and format a hard drive. This process is Data Destructive and cannot be undone. Once the process begins, ALL THE DATA ON THE DRIVE WILL BE LOST! |
| Important: Please note if this is the first time connecting an external device to a macOS, there is a Reformatting Required for Mac OS Compatibility, please see Answer ID 3879: Reformatting Required for Mac OS Compatibility. |
Western Digital does not recommend multiple partitions due to potential corruption of the Partition table. The partition table is used to display each partition within the Operating System and if this becomes corrupted it will lead to data loss. Please contact Microsoft or Apple for more support.
Select an Operating System (OS) | ||||
| Windows 10 and 8.1 | Click here for Instructions | |||
| Windows 7 and Windows Vista | Click here for Instructions | |||
| macOS 10.14.x (Mojave) | Click here for Instructions | |||
| macOS 10.13.x (High Sierra) | Click here for Instructions | |||
| macOS 10.11.x (El Capitan) and macOS 10.12.x (Sierra) | Click here for Instructions | |||
| macOS 10.9.x (Mavericks), and macOS 10.10.x (Yosemite) | Click here for Instructions | |||
| macOS 10.7.x (Lion), and macOS 10.8.x (Mountain Lion) | Click here for Instructions | |||
| Both Windows and macOS (exFAT & FAT32) | Click here for Instructions | |||
- APFS formatted volumes can be read by a macOS High Sierra (10.13), but not by a macOS Sierra (10.12) or earlier.
For more information, please refer to Apple KBA ID HT208018 - Prepare for APFS in macOS High Sierra - If the following message occurs during the format procedure, MediaKit reports not enough space on device for requested operation. Operation failed.., please refer to Answer ID 20270: macOS Disk Utility Error 'MediaKit reports not enough space on device for requested operation'
- For instructions to convert a drive to (APFS) Apple File System Format on macOS High Sierra (10.13), please refer to Answer ID 9968: How to Convert a WD External Drive to Apple File System (APFS) Format
| Important: If at any time an error occurs stating that the drive can not be dismounted or unmounted, this is not caused by an issue with the hard drive. Please see Answer ID 18670: When formatting or partitioning a drive, an error occurs stating the drive cannot be dismounted or unmounted for additional information on this particular issue. |
Please select an Operating System (OS) from the table above to display instructions for a specific OS.
How to Partition and Format a Drive on Windows 10 and 8.1
Partitioning a hard drive means preparing it to be used by the Operating System (OS), creating a Volume for the OS to use. Formatting, however, deletes the content of a volume to clean it, and assigns a file system to it so that data can be moved into and out of the volume. Both processes are normally done together.
| Critical: The instructions in the article below are designed to help repartition and format a hard drive. This process is Data Destructive and cannot be undone. Once the process begins, ALL THE DATA ON THE DRIVE WILL BE LOST! |
Windows 10 includes a built in utility known as Disk Management that can be used to partition and format a hard drive. To partition and format the drive with Disk Management, follow these steps:
- Right-click on Start, the Windows logo on the bottom-left of the screen, and click Disk Management.
- In the Disk Management window, the lower pane will display a list of available drives. Identify the drive that needs to be partitioned and formatted, and make sure that all critical data on this drive has been backed up elsewhere. If there is already a partition on the drive, the bar above that drive will appear blue. If there is no critical data on the drive, or the data has been successfully backed up, right-click the bar and click Delete Volume.
Important: If Disk Management shows the drive as Not Initialized, the drive will have to be initialized. For assistance initializing a hard drive, please see Answer ID 18824: How to initialize or write a signature to a secondary hard drive or Solid State drive in Windows. - If there is no partition and data on the drive, it will appear as Unallocated, with a black bar on top. Right-click the Unallocated space or the black bar, and click New Simple Volume.
- The Welcome to the New Simple Volume Wizard will open. Click Next to proceed.
- Choose the volume size and click Next. By default, the maximum disk space is already selected and it is recommended to leave it at the maximum disk space. Note:
To create multiple partitions, select or type a specific number of megabytes (MB) for the first partition and continue to the next step. Once done with this process, the remaining space will display as unallocated space. Now, create another New Simple Volume in the remaining unallocated space for the next partition. For example, on a 2TB drive, set the volume size to 1000000 (1 TB) and continue to the next step. When done, begin the New Simple Volume process again and select the remaining capacity, the unallocated space, for another 1TB partition. - Assign a drive letter to represent the volume being created, and click Next. By default, this is the next available letter.
- Next is the File System, which controls how the data is read and written. Set the file system to NTFS, which is the default Windows file system, and leave the Allocation unit size to Default. The Volume Label field can be customized in order to give the volume a desired name, such as My Book or WD Black 1. Check the box labeled Perform a quick format and click Next.
- Click Finish to begin formatting the drive.
- When complete, the drive will appear with a blue bar as in the image below.
How to Partition and Format a Drive on Windows 8 or 8.1
Partitioning a hard drive means preparing it to be used by the Operating System (OS), creating a Volume for the OS to use. Formatting, however, deletes the content of a volume to clean it, and assigns a file system to it so that data can be moved into and out of the volume. Both processes are normally done together.
| Critical: The instructions in the article below are designed to help repartition and format a hard drive. This process is Data Destructive and cannot be undone. Once the process begins, ALL THE DATA ON THE DRIVE WILL BE LOST! |
Windows 8 includes a built in utility known as Disk Management that can be used to partition and format a hard drive. To partition and format the drive with Disk Management, follow these steps:
- Right-click on the lower-left corner of the desktop screen and click Disk Management.
- In the Disk Management window, the lower pane will display a list of available drives. Identify the drive that needs to be partitioned and formatted, and make sure that all critical data on this drive has been backed up elsewhere. If there is already a partition on the drive, the bar above that drive will appear blue, which indicates the drive is already formatted and may contain data. If there is no critical data on the drive, or the data has been successfully backed up, right-click the bar and click Delete Volume.
Important: If Disk Management shows the drive as Not Initialized, the drive will have to be initialized. For assistance initializing a hard drive, please see Answer ID 18824: How to initialize or write a signature to a secondary hard drive or Solid State drive in Windows. - If there is no partition and data on the drive, it will appear as Unallocated, with a black bar on top. Right-click the Unallocated space or the black bar, and click New Simple Volume.
- Click Next to proceed.
- Choose the volume size and click Next. By default, the maximum disk space is already selected and it is recommended to leave it at the maximum disk space. Note:
To create multiple partitions, select or type a specific number of megabytes (MB) for the first partition and continue to the next step. Once done with this process, the remaining space will display as unallocated space. Now, create another New Simple Volume in the remaining unallocated space for the next partition. For example, on a 2TB drive, set the volume size to 1000000 (1 TB) and continue to the next step. When done, begin the New Simple Volume process again and select the remaining capacity, the unallocated space, for another 1TB partition. - Assign a drive letter to represent the volume being created, and click Next. By default, this is the next available letter.
- Next is the File System, which controls how the data is read and written. Set the file system to NTFS, which is the default Windows file system, and leave the Allocation unit size to Default. The Volume Label field can be customized in order to give the volume a desired name, such as My Passport or WD Black 1. Check the box labeled Perform a quick format and click Next.
- Click Finish to begin formatting the drive.
- When complete, the drive will appear with a blue bar as in the image below.
How to Partition and Format a Drive on Windows 7 and Windows Vista
| Critical: The instructions in the article below are designed to help repartition and format a hard drive. This process is Data Destructive and cannot be undone. Once the process begins, ALL THE DATA ON THE DRIVE WILL BE LOST! |
Windows includes a built in utility known as Disk Management that can be used to partition and format a hard drive. To partition and format the drive with Disk Management, follow these steps:
- Click on Start and right-click Computer.
- Click on Manage.
- A window called Computer Management will open, displaying two panes. On the left-side pane, under Storage, click on Disk Management. This will load Disk Management on the right-side pane. Disk Management will proceed to display all the hard drives detected by Windows. The window may need to be maximized in order to see all the drives listed.
- The lower pane will display a list of available drives. Identify the drive that needs to be partitioned and formatted. It typically has a black bar indicating unallocated space.
Important: If Disk Management shows the drive as Not Initialized, the drive will have to be initialized. For assistance initializing a hard drive, please see Answer ID 18824: How to initialize or write a signature to a secondary hard drive or Solid State drive in Windows. If there is already a partition on the drive, the bar above that drive will appear blue. this indicates that the drive is already formatted and may contain data. Make sure that all critical data on this drive has been backed up elsewhere. When ready to proceed, right-click on the blue bar and choose Delete Volume. The bar should now be black.
- Right-click on the unallocated space or the black bar to see a menu of available options, and click on New Simple Volume.
- The Welcome to the New Simple Volume Wizard will appear. Left-click on Next to proceed to the next screen.
- Choose the volume size and click Next. By default, the maximum disk space is already selected and it is recommended to leave it at the maximum disk space. Note:
To create multiple partitions, select or type a specific number of megabytes (MB) for the first partition and continue to the next step. Once done with this process, the remaining space will display as unallocated space. Now, create another New Simple Volume in the remaining unallocated space for the next partition. For example, on a 2TB drive, set the volume size to 1000000 (1 TB) and continue to the next step. When done, begin the New Simple Volume process again and select the remaining capacity, the unallocated space, for another 1TB partition. - Assign a drive letter to represent the volume being created, and click Next. By default, this is the next available letter.
- Next is the File System, which controls how to data is read and written. Set the file system to NTFS, which is the default Windows file system, and set Allocation unit size to Default. The Volume Label field can be customized in order to give the volume a desired name, such as My Passport or WD Black 1. Check the box labeled Perform a quick format and click Next.
- Click Finish to begin formatting the drive.Note:
If an error message is received stating that Windows is unable to unmount the drive, this means that there is a program or service currently reading or writing data on the drive. Determine what program is accessing the drive and shut it down, and then try again. Please see Answer ID 16330: Unable to safely remove (unmount) a WD external drive in Windows for assistance with this error under Windows. - The listing for the drive (Disk 3 in the picture below) will say Formatting as it formats the drive. This process may take a few seconds.
- When the drive is done (Disk 3 in the picture below), the bar will be blue and the drive will say Healthy.
How to Partition and Format a Drive on Windows Vista
Partitioning a hard drive means preparing it to be used by the Operating System (OS), creating a Volume for the Operating System to use. Formatting, however, deletes the content of a volume to clean it, and assigns a file system to it so that data can be moved into and out of the volume. Both processes are normally done together.
| Critical: The instructions in the article below are designed to help repartition and format a hard drive. This process is Data Destructive and cannot be undone. Once the process begins, ALL THE DATA ON THE DRIVE WILL BE LOST! |
Windows Vista includes a built in utility known as Disk Management that can be used to partition and format a hard drive. Please see Answer ID 18075: How to access Disk Management in Windows for more information.
Please follow the steps outlined below:
(2) Receive a 1 year limited warranty plus 4 years extended limited warranty by registering within 90 days. Lexmark prevail pro705 printer driver for mac. See Statement of Limited Warranty for details.
- The lower pane will display a list of available drives. Identify the drive that needs to be partitioned and formatted. It typically has a black bar indicating unallocated space.
Important: If Disk Management shows the drive as Not Initialized, the drive will have to be initialized. For assistance initializing a hard drive, please see Answer ID 18824: How to initialize or write a signature to a secondary hard drive or Solid State drive in Windows. If there is already a partition on the drive, the bar above that drive will appear blue. this indicates that the drive is already formatted and may contain data. Make sure that all critical data on this drive has been backed up elsewhere. When ready to proceed, right-click on the blue bar and choose Delete Volume. The bar should now be black.
- Now right-click on the unallocated space or the black bar to see a menu of available options, and click on New Simple Volume
- The Welcome to the New Simple Volume Wizard will appear. Left-click on Next to proceed to the next screen
- Choose the volume size and click Next. By default, the maximum disk space is already selected and it is recommended to leave it at the maximum disk space. Note:
To create multiple partitions, select or type a specific number of megabytes (MB) for the first partition and continue to the next step. Once done with this process, the remaining space will display as unallocated space. Now, create another New Simple Volume in the remaining unallocated space for the next partition. For example, on a 2TB drive, set the volume size to 1000000 (1 TB) and continue to the next step. When done, begin the New Simple Volume process again and select the remaining capacity, the unallocated space, for another 1TB partition. - Assign a drive letter to represent the volume being created, and click Next. By default, this is the next available letter
- Next is the File System, which controls how to data is read and written. Set the file system to NTFS, which is the default Windows file system, and set Allocation unit size to Default. The Volume Label field can be customized in order to give the volume a desired name, such as My Passport or WD Black 1. Check the box labeled Perform a quick format and click Next
- Click Finish to begin formatting the driveNote:
If an error message is received stating that Windows is unable to unmount the drive, this means that there is a program or service currently reading or writing data on the drive. Determine what program is accessing the drive and shut it down, and then try again. Please see Answer ID 16330: Unable to safely remove (unmount) a WD external drive in Windows for assistance with this error under Windows. - The listing for the drive (Disk 1 in the picture below) will say Formatting as it formats the drive. This process may take a few seconds
- When the drive is done (Disk 1 in the picture below), the bar will be blue and the drive will say Healthy
How to format a drive on macOS 10.14.x (mojave)
| Critical:The instructions in the article below are designed to help repartition and format a hard drive. This process is Data Destructive and cannot be undone. Once the process begins, ALL THE DATA ON THE DRIVE WILL BE LOST! |
- Open Disk Utility. Please See Answer ID 3823: How to access Disk Utility on macOS
- From the left Column chose the External drive (My Passport, My Book, etc..)
- Click the Erase Button
- Type the drive new Name (My Passport, My Book, etc..)
- Click the Format drop down
- Choose a new Format: Mac OS Extended (Journaled)
- Click Erase button
- When finished, the drive will be formatted and repartitioned successfully. Click the Done button
How to partition and format A DRIVE ON macOS 10.13.x (High Sierra)
| Critical:The instructions in the article below are designed to help repartition and format a hard drive. This process is Data Destructive and cannot be undone. Once the process begins, ALL THE DATA ON THE DRIVE WILL BE LOST! |
- Open Disk Utility. Please See Answer ID 3823: How to access Disk Utility on macOS
- In the top menu bar, go to View, and choose Show All Devices
- Click the eject button next to the drive volume (My Passport, etc)
The drive Volume will now be greyed out - Select the drive (WD My Passport _____ Media, etc)
- Click the Erase button
- Choose a new Format: Mac OS Extended (Journaled)
Choose Scheme: GUID Partition Map - Type the drive new Name
- Click the Erase button
- When finished, the drive will be formatted and repartitioned successfully. Click the Done button
| Critical:The instructions in the article below are designed to help repartition and format a hard drive. This process is Data Destructive and cannot be undone. Once the process begins, ALL THE DATA ON THE DRIVE WILL BE LOST! |
Steps for macOS 10.11.x (El Capitan) and macOS 10.12.x (Sierra)
- Open Disk Utility. Please See Answer ID 3823: How to access Disk Utility on macOS
- Click the Eject button next to the external hard drive volume (My Passport, etc)
- The drive will now be greyed out
- Click the Erase button
- Choose a new Format: Mac OS Extended (Journaled)
Choose Scheme: GUID Partition Map - Type the drive new Name
- Click the Erase button
- When finished, the drive will be formatted and repartitioned successfully. Click theDone button
How to Format or Partition a Drive on Mac OSX 10.9.x (Mavericks) and 10.10.x (Yosemite)
Partitioning a hard drive means preparing it to be used by the Operating System (OS), creating a Volume for the OS to use. Formatting, however, deletes the content of a volume to clean it, and assigns a file system to it so that data can be moved into and out of the volume. Both processes are normally done together.
| Critical: The instructions in the article below are designed to help repartition and format a hard drive. This process is Data Destructive and cannot be undone. Once the process begins, ALL THE DATA ON THE DRIVE WILL BE LOST! |
Mac OSX 10.9.x, and 10.10.x include a built in utility known as Disk Utility that can be used to partition and format a hard drive. To partition and format the drive with Disk Utility, follow these steps:
- Double left-click on the Mac HD, the internal Mac hard drive visible on the top-right corner of the desktop screen. Choose Applications from the left-side panel. While in there, open Utilities, and lastly double-click on Disk Utility.
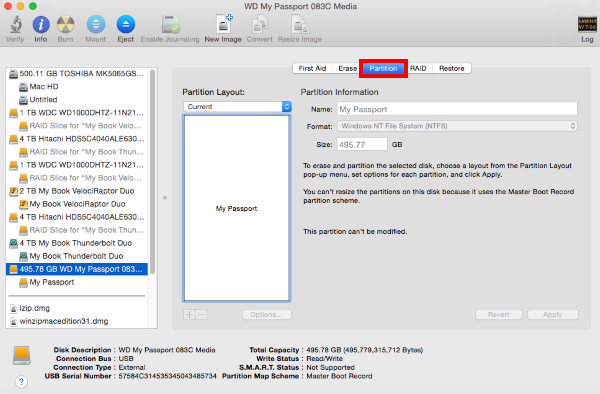
- Disk Utility will now be open. In the left-side pane, choose the drive that is to be partitioned and formatted. Typically there are two listings for each drive unless more than one partition exists on a particular drive. Choose the drive listing that is farthest to the left for the drive that will be formatted. It is usually directly above the name of the drive. In the example below, the one to be selected would be 495.78 GB WD My Passport 0830 Media.
- After selecting the appropriate drive, additional options will appear on the right-side pane. Click on Partition.
- In the Partition area, click on the drop-down box under Partition Layout and select 1 Partition.Note:
Partitioning a drive is only necessary if planning to use multiple partitions on the drive. It's recommended using a single partition in most cases, if the primary objective is to simply prepare the drive for use with the computer, no partitioning is required. No further action is required. - Click on the drop-down next to Format and from the drop-down menu select Mac OS Extended (Journaled). This is the format that the drive will be formatted to.
- In the Name area, a drive name can be given to the drive by just typing in the desired name or drive label.
- Click the Options button and choose Apple Partition Map. Then, click on Ok. Lastly, click on Apply.
Important: If the Mac computer being used is an Intel-based Mac, Apple recommends to use the GUID Partition Table instead. - A confirmation box will appear, reminding users that partitioning and formatting the drive will erase all information that is on the drive. Make sure that all critical information on the drive is backed up elsewhere before continuing. If not, copy the data to another location. When ready, click on Partition.
- The disk will be unmounted before being formatted.Note:
If an error message is received stating that the drive is unable to be unmounted, this means that there is a program or service currently reading or writing data on the drive. Determine what program is accessing the drive and shut it down before trying to format the drive again. If the error message persists, restarting the computer may resolve the issue. If additional assistance is required, please Contact Us. - The drive is now formatting and at the bottom of the Disk Utility panel a Status Bar displaying the name of the drive, the format that's being applied to it, as well as the given name. When finished, the bar will go away and the drive will now be listed on the desktop.
How to Format or Partition a Drive on Mac OSX 10.7.x (Lion) and 10.8.x (Mountain Lion)
Partitioning a hard drive means preparing it to be used by the Operating System (OS), creating a Volume for the OS to use. Formatting, however, deletes the content of a volume to clean it, and assigns a file system to it so that data can be moved into and out of the volume. Both processes are normally done together.
| Critical: The instructions in the article below are designed to help repartition and format a hard drive. This process is Data Destructive and cannot be undone. Once the process begins, ALL THE DATA ON THE DRIVE WILL BE LOST! |
Mac OSX 10.7.x, and 10.8.x include a built in utility known as Disk Utility that can be used to partition and format a hard drive. To partition and format the drive with Disk Utility, follow these steps:
- Double left-click on the Mac HD, the internal Mac drive. Choose Applications, then Utilities, and double-click on Disk Utilities. Note:
If the screen does not look like the one in the picture below, the folder view may be set to a different one. Click on the Columns button (it's highlighted in blue in the screenshot) in the upper left corner of the window to change to the same view used here. - In the far left pane, choose the drive that is to be partitioned and formatted. Typically there are two listings for each drive, unless that particular drive has more than one partition in it. Choose the drive listing that is farthest to the left for the drive that is to be formatted. It is usually directly above the name of the drive. Once the drive has been selected, click on the Partition tab.
- Under Volume Scheme click the drop-down box and select 1 partition.
- Now, click the Options button and choose Apple Partition Map, then click on Ok.
Important: If the Mac computer being used is an Intel-based Mac, Apple recommends to use the GUID Partition Table instead. - Click on the drop-down next to the Format option and change the Format to Mac OS Extended (Journaled). A name can also be given to the drive by typing it into the Name box. When done, click on Apply.
- A box will come up warning that formatting and partitioning the drive will erase all of the information that is on the drive. If the information on the drive is no longer needed, then click on Partition. If the data on the drive is still needed, it will need to be copied to another location before proceeding.
- The drive is now formatting, and a status bar will be displayed at the bottom of the Disk Utility window. This status bar will say formatting the disk, and gives the name of the drive, the format it is applying, and the name that was specified for it. When it is done, this bar will go away and the drive should now be listed on the desktop.
If additional assistance is required, or more information is needed, please Contact Us. Do not use the answer rating below to report technical issues.
Formatting A WD Drive To Be Compatible With Both Windows and Mac OSX
Please see Answer ID 20821: How to format a WD hard drive to exFAT or FAT32 file system for assistance formatting a drive to be used on both a Windows PC and a system running Mac OSX.
Got a new WD My Passport drive? Not sure how to set it up on your Mac or maybe you are thinking about buying one and want to know whether it would work on your Mac. The answer is yes! Don’t worry in 10 quick steps I’ll tell you how to format WD My Passport for Mac. One of the first things to note is that there are two main versions available of this external hard drive. The first is preformatted and is called simply WD My Passport.
Incidentally it is the cheaper version to buy. NTFS as a disk format (also referred to as a file system) is designed to plug into a Windows PC. NTFS version The drive in this format is readable by a Mac but cannot be written to by a Mac. But don’t worry this default file system is easy to change with a little bit of know how, a few clicks of your mouse and of course this article. The second version the WD My Passport comes in is a ‘for Mac’ version. This means it is preformatted at the factory to HFS (Hierarchical File System) version It is worth bearing in mind that HFS and Mac OS Extended (Journaled) file system are one and the same. It is just that Mac OS Extended (Journaled) file system is how the file system is referred to on the Mac within its menus.
It is designed to be ‘plug and play’. Plug into your Mac and just use the disk.
You do pay extra for this preformatting and in my experience I have occasionally found that you end up reformatting anyway because – Well a Mac is just a Mac and sometimes they just want the disks on them they have formatted themselves You need to format the NTFS version of WD My Passport for a Mac and the second you ‘may’ need to format depending on how your Mac feels, so why not save yourself some dollars and go for the cheaper NTFS formatted version? Table of Contents.
What do you plan to use the WD My Passport Drive For? It is worth taking a few minutes before you go ahead and format your shiny new drive, thinking about your planned use. For example are you thinking of. Storage of files. Using the drive as your Time Machine backup disk?. Do you plan to share files and inter connect Mac and a PC? Storage of files You can drag and drop, copy and paste files from your hard disk to your WD My Passport Drive.
Remember though if your intension is to free up space on your Mac and the only copy of your files now live on the My Passport drive what will you do if something happens to that drive? You still should have a backup so seriously think about getting a second external hard drive to keep extra copies on. Just in case. My Passport as a Mac Time Machine Backup Drive Using your WD My Passport for Time Machine is perfectly fine.
Format it correctly. Then tell Time Machine on your Mac to use the drive to back up to. You will need the whole hard drive or a partition of the hard drive allocated to Time Machine.
Drives can be split up into different sections – like sharing candy where you give each piece to a particular person. Hard drives can be virtually split up and each section can be given over to do a particular job. The hard drive or partition given over to Time Machine must be at least as big as the amount of data you are using or backing up on your hard drive.
Ideally twice as big to give you room to grow into. Or you can take the total amount of internal disk you have let us say you have a 500 GB internal drive and get a WD My Passport twice as big. A 1 TB drive or a 1 TB partition allocated to Time Machine. WD My Passport Compatible with Mac and PC?
This requirement will be in addition to what you’re going to need for Time Machine and you will need additional hard drive space for that. An Example You want some space to copy and paste your photos to.
You need 400 GB for that. You want to do regular backups and your internal drive is 1TB in size so you’re going to need 2TB for that. You want an area to swap files between your Mac and a Windows PC you have and you need 500 GB for that. In this example you would go ahead and purchase a 3TB as a minimum; Probably two so that you can have one as a copy of the other in case of a disaster and one drive failed. One other thing formatting uses up space on a hard drive so if my total figures were really close to the hard drive capacity I was thinking of, I would purchase the next size drive up. That way I would make sure I had the room I needed.
Format WD My Passport for Mac 10 Quick Steps These instructions are for the release of Mac OS Sierra. For earlier releases of the Mac OS the instructions are the same except the screens may look slightly different. One thing before I take you through the steps of how to format your WD My Passport for Mac. Formatting the WD My Passport will erase any existing data on the hard drive. In fact on the Mac, you choose the Erase button to do it, so that’s clear.
It is destructive process and if there are any files on there you want to keep. For example, there is software on the WD My Passport drive, NTFS version that is designed for and works on a Windows PC. If you plan on using those files, copy off onto a Windows PC first before you format the drive. If you have files already stored on there from a Windows PC copy them off onto a Windows PC Before you format, or you will be in a world of trouble trying to get them back again, and you may not.
Let me show you how in ten quick steps using words and pictures. There is a video at the end you can watch as an additional resource. First physically connect your WD My Passport drive to your Mac? Power up your Mac, log in and connect up the WD My Passport drive. The drive will appear as an icon on your desktop. Internal and External Drives List Clicking the arrow under the headings will expand or contract the list.
The My Passport drive should now appear under the external heading in this list. If it hasn’t, it may well be that your Mac’s USB port has gotten confused. A shutdown, restart and reconnect of the drive should sort that out. Select the the external hard drive list.
Be sure you are selecting the external drive – important. Also select the drive at the top level of the hierarchy.
You can experience problems formatting the drive if it is not selected at the right level. Double check. Format Window Popup First give your drive a name.
I suggest you give a name to reflect the use you are going to put the hard drive to. The up and down arrows to the right hand side of the format option allows you to choose a format for the whole disk. Choose Mac OS Extended (Journaled) if you plan to use the hard drive with Time Machine, or for copying and pasting files to. Choose format if you plan to share this drive between a Mac and a PC and you want the files to be visible and read and writeable by both. File System Formats Don’t select.
That file system is slow, old and has file size restrictions. These days it is really not a practical solution for sharing files between a Mac and a PC. The exception to this is some TV’s and Media players that ask for this format.
If that is the case then you are better setting up a partition for sharing those files, rather than formatting the entire disk in this format. –.
Once you have entered a name and selected a format, click on Erase and the formatting of the My Passport external hard drive will start. It may only take a few seconds or a minute or two depending on the hard drive size. Once done dismiss the Disk Utility Screen. The formatted WD My Passport drive icon should now appear on your desktop ready for you to use. Right Click to Eject External Drive And there you have it, the format WD My Passport for Mac in 10 quick steps.
YouTube Video Covering the Format of WD My Passport for Mac This video from Acquevara shows the formatting of an external hard drive on a Mac using Mac OS Sierra. I copy it here so that if you would like to watch the video along side using my notes above you have a quick and easy link to get to it. WD My Passport External Hard-drive Set Up Guide for Mac Images and Video Credit: Acquevara Frequently Asked Questions. How can I format my Hard Drive for Resale? Be aware that the formatting procedure above will not prevent someone using specialized data recovery software to recover data from the My Passport hard drive. If you are planning on reselling your hard drive you’ll need to do a bit more than the formatting I’ve detailed above.
Instead; Once you have entered Disk Utility and selected the erase option, click on the security button. Format Security Options Button Select one of the security options and format your drive using one of them. It could take several hours for the drive to be written over and erased to remove as much of your data as possible. But at least that way you can rest easier that it will take way more effort to recover anything from your sold external hard drive. Setting up encryption and a password to secure your My Passport hard drive.
WD My Passport has 256-bit AES hardware encryption and password protection for the drive. The hardware encryption is controlled and managed via the WD Security software. The My Passport drive non Mac version does not come with a Mac version of the software however this can be downloaded direct from the Western Digital site. I personally prefer to use the facilities provided by Mac OS for encrypting my hard drive data and adding a password. Because, without the WD Security software installed and accessible by your Mac, you will not be able to access the data on the My Passport drive. If you are sharing the hard drive between Mac’s the software has to be loaded on that Mac as well. What if your Mac has failed and the backup you need to restore it with is on the My Passport drive.
To get to it you need the WD Security software. But your Mac is wiped. You need your Mac restored to get to it.
You see the problem? You are then in an almighty bind. It has happened to users.
Mac OS will always recognize its own encryption and password methods. You can encrypt your data and set a password by selecting Mac OS Extended (Journaled, Encrypted) file system. Time Machine Auto Backup Check Time Machine auto backup is selected off. Uncheck the check box and try again.
Often simply retrying the formatting clears the problem. I am having problems formatting an external hard drive since upgrading to High Sierra. There have been quite a lot of discussions on various forums where users are having problems formatting hard drives since upgrading to Mac OS High Sierra. I am sure Apple will produce a fix soon but in the mean time to format WD My Passport for Mac try these. If the icon doesn’t appear on the desktop when you plug in to format, go to Disk Utility and expand the external hard drive list there (step 4 above).
If it shows up there go ahead and format. Use a Windows PC to format the WD My Passport drive first to ExFAT then try again on the Mac.
Use a Mac with an older release of Mac OS to format the drive. Download the WD Discovery software for Mac from the Western Digital site.
This software allows you to check the disk health and you can format to HFS using that software. There are other options which are more complex if the above have not worked for you. Check out my resources section below to see the discussion threads.