Wd Passport For Mac Reading Error
May 5, 2016 - Tutorial to fix the disk you inserted was not readable by this Mac computer. I stored the important data on my external hard drive, one day, when. Due to the above causes, Mac Operating System fails to read the hard. When your computer cannot detect or read your WD hard drive, you can first try to change the USB cable and connect it with another USB port or new PC to see if the drive can be read or not. If the drive can be read via new a USB cable or on a new PC, then the drive is working fine.
Got a new WD My Passport drive? Not sure how to set it up on your Mac or maybe you are thinking about buying one and want to know whether it would work on your Mac. The answer is yes!
Don’t worry in 10 quick steps I’ll tell you how to format WD My Passport for Mac.
One of the first things to note is that there are two main versions available of this external hard drive.
The first is NTFS preformatted and is called simply WD My Passport. Incidentally it is the cheaper version to buy.
NTFS as a disk format (also referred to as a file system) is designed to plug into a Windows PC.
WD My Passport NTFS Version
The drive in this format is readable by a Mac but cannot be written to by a Mac. But don’t worry this default file system is easy to change with a little bit of know how, a few clicks of your mouse and of course this article.
The second version the WD My Passport comes in is a ‘for Mac’ version. This means it is preformatted at the factory to HFS (Hierarchical File System)
Windows' default NTFS is read-only on OS X, not read-and-write, and Windows computers can't even read Mac-formatted HFS+ drives. FAT32 works for both OSes, but has a 4GB size limit per file, so it. 1 day ago Format Hard Drive in exFAT for both Mac & Windows PC I am the kind of person who needs to switch between both the OS daily. So I needed a format which is both read and write on both the systems. How to Format a Hard Drive For Both Windows and Mac. Your exFAT-formatted drive or partition can now be used for both Windows and Mac. Note that using a drive frequently between Windows. The other is to format your drives with the exFAT file system. This file system can be read and written by both Mac and Windows with support for single files of up to 128 petabytes! Even better, it’s freely included in both operating systems. A drive can be formatted with exFAT using either a Windows or a Mac computer. Formatting a drive for both mac and windows using ex-fat.
Dolphin emulator download mac os x. Download the latest version of the Dolphin Emulator (5.0-9616) from the official website. Windows x64 Mac OS X: Dolphin 4.0.2: 5 years, 2 months ago. Download Dolphin to play Wii and Gamecube on your computer.
WD My Passport for Mac version
It is worth bearing in mind that HFS and Mac OS Extended (Journaled) file system are one and the same. It is just that Mac OS Extended (Journaled) file system is how the file system is referred to on the Mac within its menus.
It is designed to be ‘plug and play’. Plug into your Mac and just use the disk. You do pay extra for this preformatting and in my experience I have occasionally found that you end up reformatting anyway because –
Well a Mac is just a Mac and sometimes they just want the disks on them they have formatted themselves …
You need to format the NTFS version of WD My Passport for a Mac and the second you ‘may’ need to format depending on how your Mac feels, so why not save yourself some dollars and go for the cheaper NTFS formatted version?
What do you plan to use the WD My Passport Drive For?
It is worth taking a few minutes before you go ahead and format your shiny new drive, thinking about your planned use. For example are you thinking of
- Storage of files
- Using the drive as your Time Machine backup disk?
- Do you plan to share files and inter connect Mac and a PC?
Storage of files
You can drag and drop, copy and paste files from your hard disk to your WD My Passport Drive. Remember though if your intension is to free up space on your Mac and the only copy of your files now live on the My Passport drive what will you do if something happens to that drive?
You still should have a backup so seriously think about getting a second external hard drive to keep extra copies on. Just in case.
My Passport as a Mac Time Machine Backup Drive
Using your WD My Passport for Time Machine is perfectly fine.
Format it correctly. Then tell Time Machine on your Mac to use the drive to back up to.
You will need the whole hard drive or a partition of the hard drive allocated to Time Machine.
Partition?
Drives can be split up into different sections – like sharing candy where you give each piece to a particular person.
Hard drives can be virtually split up and each section can be given over to do a particular job.
The hard drive or partition given over to Time Machine must be at least as big as the amount of data you are using or backing up on your hard drive.
Ideally twice as big to give you room to grow into.
Or you can take the total amount of internal disk you have let us say you have a 500 GB internal drive and get a WD My Passport twice as big. i.e. a 1 TB drive or a 1 TB partition allocated to Time Machine.
WD My Passport Compatible with Mac and PC?
This requirement will be in addition to what you’re going to need for Time Machine and you will need additional hard drive space for that.
An Example
You want some space to copy and paste your photos to. You need 400 GB for that.
You want to do regular backups and your internal drive is 1TB in size so you’re going to need 2TB for that.
You want an area to swap files between your Mac and a Windows PC you have and you need 500 GB for that.
In this example you would go ahead and purchase a 3TB WD My Passport drive as a minimum;
Probably two so that you can have one as a copy of the other in case of a disaster and one drive failed.
One other thing formatting uses up space on a hard drive so if my total figures were really close to the hard drive capacity I was thinking of, I would purchase the next size drive up.
That way I would make sure I had the room I needed.
Format WD My Passport for Mac 10 Quick Steps
These instructions are for the release of Mac OS Sierra. For earlier releases of the Mac OS the instructions are the same except the screens may look slightly different.
One thing before I take you through the steps of how to format your WD My Passport for Mac.
Formatting the WD My Passport will erase any existing data on the hard drive. In fact on the Mac, you choose the Erase button to do it, so that’s clear.
It is destructive process and if there are any files on there you want to keep. For example, there is software on the WD My Passport drive, NTFS version that is designed for and works on a Windows PC. If you plan on using those files, copy off onto a Windows PC first before you format the drive.
If you have files already stored on there from a Windows PC copy them off onto a Windows PC Before you format, or you will be in a world of trouble trying to get them back again, and you may not.
Let me show you how in ten quick steps using words and pictures. There is a video at the end you can watch as an additional resource.
- First physically connect your WD My Passport drive to your Mac?
Power up your Mac, log in and connect up the WD My Passport drive.
- The drive will appear as an icon on your desktop.
External Drive Icon On Desktop
If for some reason the My Passport drive doesn’t appear it may well show up in the next step.
- Start up the Disk Utility application. You do that by clicking on spotlight search
Typing in Disk Utility and double clicking.
Disk Utility In Spotlight Search
- You will see on the left hand side of the window your Internal and External hard drives listed.
Clicking the arrow under the headings will expand or contract the list.
The My Passport drive should now appear under the external heading in this list.
If it hasn’t, it may well be that your Mac’s USB port has gotten confused. A shutdown, restart and reconnect of the drive should sort that out.
- Select the WD My Passport in the external hard drive list. Be sure you are selecting the external drive – important.
Also select the drive at the top level of the hierarchy. You can experience problems formatting the drive if it is not selected at the right level. Double check.
Select Drive At The Right Level
- Head to the top of the Disk Utility screen and select Erase.
Remember formatting the hard drive is a destructive process and it erases the existing data on the drive. Copy off important files first.
- A pop up window will appear where you can select the file format you would like your Mac to write onto the My Passport external hard drive.
Format Window Popup
First give your drive a name. I suggest you give a name to reflect the use you are going to put the hard drive to.
The up and down arrows to the right hand side of the format option allows you to choose a format for the whole disk.
Choose Mac OS Extended (Journaled) if you plan to use the hard drive with Time Machine, or for copying and pasting files to.
Choose ExFAT format if you plan to share this drive between a Mac and a PC and you want the files to be visible and read and writeable by both.
Don’t select MS-DOS (FAT).
That file system is slow, old and has file size restrictions. These days it is really not a practical solution for sharing files between a Mac and a PC. The exception to this is some TV’s and Media players that ask for this format. If that is the case then you are better setting up a partition for sharing those files, rather than formatting the entire disk in this format.
– learn how to set up a partition on your My Passport drive here.
- Once you have entered a name and selected a format, click on Erase and the formatting of the My Passport external hard drive will start. It may only take a few seconds or a minute or two depending on the hard drive size.
- Once done dismiss the Disk Utility Screen. The formatted WD My Passport drive icon should now appear on your desktop ready for you to use.

Formatted Drive On Desktop
If you wish to connect this drive up to Time Machine and don’t know how, take a look at my article here.
If you would like to create partitions on this drive you can take a look at my article telling you how on the site via this link.
- When you are finished with the My Passport drive always remember to eject the WD My Passport drive before you plug out the USB cable. You do this by right clicking on the icon and selecting eject.
And there you have it, the format WD My Passport for Mac in 10 quick steps.
YouTube Video Covering the Format of WD My Passport for Mac
This video from Acquevara shows the formatting of an external hard drive on a Mac using Mac OS Sierra. I copy it here so that if you would like to watch the video along side using my notes above you have a quick and easy link to get to it.
WD My Passport External Hard-drive Set Up Guide for Mac
Images and Video Credit: Acquevara
Frequently Asked Questions
- How can I format my Hard Drive for Resale?
Be aware that the formatting procedure above will not prevent someone using specialized data recovery software to recover data from the My Passport hard drive. If you are planning on reselling your hard drive you’ll need to do a bit more than the formatting I’ve detailed above. Instead;
Once you have entered Disk Utility and selected the erase option, click on the security button.
Format Security Options Button
Select one of the security options and format your drive using one of them. It could take several hours for the drive to be written over and erased to remove as much of your data as possible.
But at least that way you can rest easier that it will take way more effort to recover anything from your sold external hard drive.
- Setting up encryption and a password to secure your My Passport hard drive.
WD My Passport has 256-bit AES hardware encryption and password protection for the drive. The hardware encryption is controlled and managed via the WD Security software.
The My Passport drive non Mac version does not come with a Mac version of the software however this can be downloaded direct from the Western Digital site.
I personally prefer to use the facilities provided by Mac OS for encrypting my hard drive data and adding a password.
Because, without the WD Security software installed and accessible by your Mac, you will not be able to access the data on the My Passport drive.
If you are sharing the hard drive between Mac’s the software has to be loaded on that Mac as well.
What if your Mac has failed and the backup you need to restore it with is on the My Passport drive. To get to it you need the WD Security software.
But your Mac is wiped. You need your Mac restored to get to it.
You see the problem?
You are then in an almighty bind. It has happened to users.
Mac OS will always recognize its own encryption and password methods. You can encrypt your data and set a password by selecting Mac OS Extended (Journaled, Encrypted) file system.
- Erase Process Failed Error. What now?
Mac OS Sierra has a habit of occasionally producing this error.
Erase Process Failed
It could be a Mac process is accessing the hard drive causing this error.
Check Time Machine auto backup is selected off. Uncheck the check box and try again.
Often simply retrying the formatting clears the problem.
- I am having problems formatting an external hard drive since upgrading to High Sierra.
There have been quite a lot of discussions on various forums where users are having problems formatting hard drives since upgrading to Mac OS High Sierra. I am sure Apple will produce a fix soon but in the mean time to format WD My Passport for Mac try these.
a. If the My Passport hard drive icon doesn’t appear on the desktop when you plug in to format, go to Disk Utility and expand the external hard drive list there (step 4 above). If it shows up there go ahead and format.
b. Use a Windows PC to format the WD My Passport drive first to ExFAT then try again on the Mac.
c. Use a Mac with an older release of Mac OS to format the drive.
d. Download the WD Discovery software for Mac from the Western Digital site. This software allows you to check the disk health and you can format to HFS using that software.
There are other options which are more complex if the above have not worked for you. Check out my resources section below to see the discussion threads.
Resources
My WD Passport Ultra 1TB, lived for a long 2-3 years, never any issues, but recently it start work really slow, and take a long time to respond. Likely, I was able to recover all the data from it, and tried to reincarnate the drive.
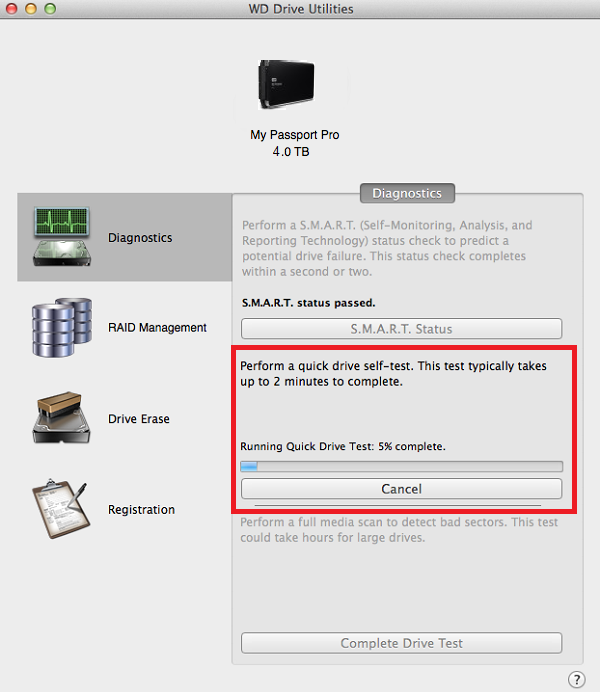
I'm mac user, and Disk Utility app (mac default) can format (erase) it, but if I'll run the First Aid, it will show me the error, and suggest to back up the data. The WD utility, acting really weird on my 2015 MacBook pro, it crashing all the time. However, it can check the S.M.A.R.T. status, but can't run quick or complete test of the drive.
The question is, any suggestion how I can repair it using other software, maybe from Windows? Could it be bad sectors, or other issues? Any help will be greatly appreciated. Thanks!
Is this a good question?