How To Customize Invoice In Quickbooks For Mac
You don't need to be an accountant to know how to use QuickBooks. Learn how to manage the finances for your small business yourself with the Mac version of this powerful accounting package. Jess Stratton shows how to create a new company file and back it up on a regular basis, and then set up accounts, taxes, and inventory items. Once your accounts are established, learn how to create estimates and purchase orders, send invoices, receive payments, and print checks—all of the day-to-day tasks that keep your business running. Finally, learn to integrate with online banking, find data and run reports, and close the books with end-of-year preparations. Instructor. Jess Stratton is a staff author and technology consultant who specializes in productivity software and mobile tech.
Dec 10, 2018 - QB operates in a sticky mode. You select the template and save the invoice, the next time you open an invoice QB remembers the template last.
For over 10 years, Jess Stratton has operated her own technology consulting business, creating and maintaining databases for both enterprise and small-to-medium businesses, building websites, setting up networks, and coaching teams, employees, and individuals to harness the latest desktop and mobile technology for increased productivity. Jess is now a full-time staff author at lynda.com, in addition to being a regular and regarded presenter at Lotus Notes conferences and a contributing author for several industry print and web magazines, textbooks, podcasts, webcasts, and other popular sites, including Lifehacker.com. You can find Jess on her website at or follow her on Twitter @NerdGirlJess. By: Jess Stratton course. 24h 52m 20s.
90,748 viewers. Course Transcript I can customize any form in QuickBooks. Let's take this invoice that I have for example.
Now remember when I am in any form in QuickBooks, it will always looks the same in the top left. I can click on the eye icon if I want to preview how its going to look to the customer, and I can click on the eye again to go back to editing it. I can also change the template by clicking the drop down. Now QuickBooks does usually give me a number of choices per each transaction, but I can also create my own or edit the current template. Now I can choose to edit the current template, but in this case I'm going to select new template because that way, I'll know if I ever want to go back to the old one, it will be there untouched. So I'm going to create new template. This gives me a starting point and it brings me into the layout designer where I can make changes.
So let's start by making a basic change. Here's a block of text where it's the bill to address of the customer. If I don't like it where it is I can click with my mouse and drag that entire block somewhere else on the page. You'll notice the snap two lines appear while I'm dragging it around on the page. So I can move it around and place it anywhere I want. The next thing I can do, I can add fields directly to the form. For example if I click the Fields button it brings up a dialog box with fields that are customizable to an Invoice.
Now this list of fields is going to change depending on what form I'm currently editing. So I can choose not to have my company address show up, I'll un-check the print button and you'll notice on the left side. But the address has gone away. I'll put it back and I can also add things, for example, my company's website. Once I'm done choosing any field and you'll notice that I can click through all these tabs and place check boxes next to things that I either want or don't want. For example, if my business doesn't use PO numbers.
I can uncheck these. It's the same thing with terms. So when I'm all through going through what fields I want to add I can close out of this check box, and for all the changes I've made I can get them lined up how I want them. I can also change the font properties.
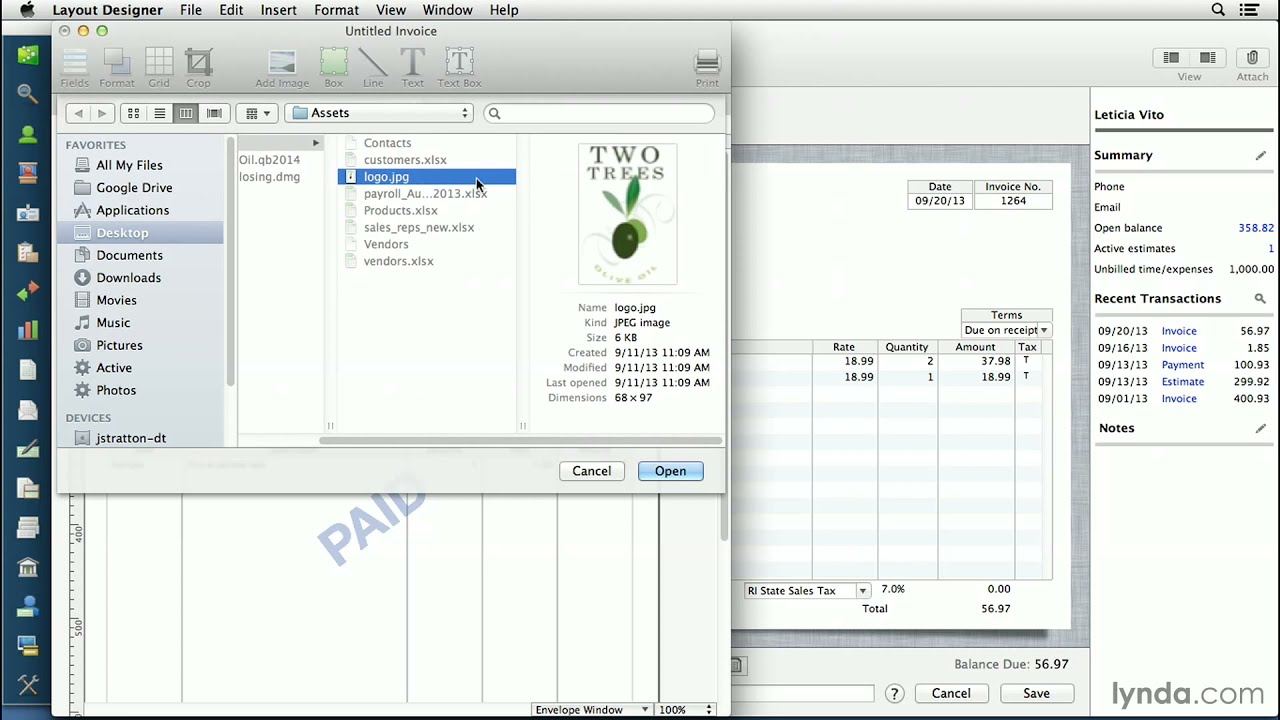
For example, I can click on the name of my company and select Format from the top menu. Select Font Style, and I can bold it. I can also make the text a little bit bigger. I can insert Images also. I'll click the Add Image button, and I'm brought to an Add Image dialog box where I can browse my file system and choose something like a company logo. Select the image, and click Open. It appears on the form and now I can drag it around to wherever I want it to show up on my invoice.
When I'm all done making my changes, I can select File, Save As, and now I need to give my new template a name (SOUND). I'll call this Two Trees Invoice. Click the blue OK button and now I can close out of the layout designer. Now, by default, it lets me choose from the Two Trees invoice, from the current choices of my invoice. And at any time, I can click this preview button (SOUND). And here's what my new customized invoice is going to look like, when I send it to this customer. So that's how easy it is to customize any form.
I'll close out of this, and I'll come into an Estimate and I can do the same thing. I can choose New Template. I'm brought to an Estimate. And again I can Add an Image.
Put my logo on it. Drag it to where I want to.
And I could get everything else set up. Choose File, Save As, and then I'll call this, Two Trees Estimate, click OK.
Close out, and now I can come in, in my standard estimate, and I can pick my Two Trees Estimate. And I'm off and running with the new estimate that has my logo on it. So that's how easy it is to customize any form that you want to in QuickBooks. Watch this course anytime, anywhere.
Swap x and y axis without manually swapping values. Microsoft Excel for Mac 2011 v 14.5.9. Change the axis type of an Excel chart using PowerShell. Excel for Office 365 PowerPoint for Office 365 Word for Office 365 for Mac Excel 2019 Word 2019 PowerPoint 2019 Excel 2016 Word 2016 PowerPoint 2016 More. Less In charts, axis labels are shown below the horizontal (also known as category ) axis, next to the vertical (also known as value ) axis, and, in a 3-D chart, next to the depth axis. Change axis labels in excel for mac not working. Much like a chart title you can add, axis titles help the people who view the chart understand what the data is about. Here’s how you add axis titles: Make sure you’re working in Excel Online edit mode. If you’re in view mode, click Edit Workbook > Edit in Excel Online. As shown in the figure below, the horizontal axis is automatically produced by the Excel and labeled as 1,2.,n. What I wanna to do is to change these labels into such a form as case A, case B.
Course Contents. Introduction Introduction. 1. Navigating QuickBooks 1. Navigating QuickBooks.
2. Working with Company Files 2. Working with Company Files. 3. Setting Up Shop 3. Setting Up Shop. 4.
Adding Customers 4. Adding Customers. 5.
Working with Vendors 5. Working with Vendors.
6. Adding Employees 6. Adding Employees. 7. Day-to-Day Operations 7. Day-to-Day Operations.
8. Handling Special Cases 8. Handling Special Cases.
9. Online Banking 9. Online Banking.
Best blu ray burner for older mac pro 2. 10. Sharing QuickBooks with Others 10. Sharing QuickBooks with Others.
11. Finding Information Quickly 11. Finding Information Quickly. 12. Reports. 13. End-of-Year Preparations 13.
End-of-Year Preparations. 14. Customizing QuickBooks 14. Customizing QuickBooks. Conclusion Conclusion.