How Long Does It Take To Prepare Source For Transfer Information To This Mac From Time Capsule
Feb 7, 2019 - Use Migration Assistant to copy all of your documents, apps, user accounts,. Make sure that your old Mac has a computer name: Choose Apple ( ) menu. Or connect your new Mac to a Time Machine backup of your old Mac. If you have a lot of content, the transfer might take several hours to finish.
Migration Assistant Can Move Your PC Data to Your Mac
Now that you've switched to a Mac as your new computing platform, you may wonder how you're going to move all your stuff from your Windows PC to the Mac. Well, you're in luck; making the move to the Mac doesn't require tossing out all of your Windows data and files. For the most part, all of your Windows user data, including documents, pictures, music, and videos, can make the journey to the Mac without too much trouble.
Your Windows applications, however, will have to stay behind. They depend on a Windows operating system, and won't run directly on a Mac. But don't worry; if there's an application that you just can't live without or that doesn't have a Mac equivalent, there are ways to run a Windows environment on a Mac. You'll need to either dual-boot your Mac between Windows and the Mac OS, or run third-party virtual machine software. You can find an outline of how to run Windows using your Mac in the guide:
For now, let's focus on moving your user data to your new Mac, so you can get back to work or have a bit of fun.
Using the Apple Retail Store to Transfer Data
There are various options for transferring Windows data, depending on the version of OS X or macOS that came with your Mac. The easiest method is to have an Apple retail store move your Windows data for you. If you purchase your Mac at an Apple retail store, and you happen to show up with your PC, store staff will move the data for you, as part of the Mac setup process. Of course, for this method to work, you need to plan ahead. You must have your Windows machine with you when you buy a Mac, and you must be willing to wait. Depending on how busy the store is, the wait could be as little as an hour, or as long as a day or more.
You can speed things up by calling ahead and making an appointment to purchase a Mac. Be sure to mention that you also want to transfer your data from your Windows machine. Apple store staff will set up a time, and give you an estimate of how long the process will take.
Using the Mac's Migration Assistant
If you're not good at planning ahead or hanging around an Apple retail store doesn't appeal to you, there are a couple of do-it-yourself options for migrating your PC data to your Mac.
My passport for mac exfat. Your new Mac will include a Migration Assistant that was originally designed to make it easier to upgrade from one Mac model to another. You connect two Macs using a FireWire or Thunderbolt cable or a network connection and then use the Migration Assistant to copy user data, applications, and system settings to the new Mac.
With the advent of OS X Lion (10.7.x), the Migration Assistant gained the ability to copy user data from PCs running Windows XP, Windows Vista, or Windows 7. With subsequent versions of OS X were released, the Migration Assistant picked up the ability to work with Windows 8. Windows 10 and later. The Migration Assistant can copy your Windows user accounts although it cannot copy your passwords, so be sure you know your user account password before you make the transfer. The Migration Assistant can also copy your documents, as well as emails, contacts, and calendars from Microsoft Outlook (2003 and later), Outlook Express, Windows Mail, and Windows Live Mail.
Using the Migration Assistant
The Mac Migration Assistant requires that the Mac and the PC be connected to the same local network. You don't need to worry about setting up any type of file sharing on either computer; they just need to be on the same network.
The transfer process involves running a copy of the Migration Assistant on your Mac and a copy on your PC. Since you'll be working with two different computers, and two applications that have the same name, we'll preface each step in this guide to using the Migration Assistant with either PC or Mac, to make it clear which application the instructions refer to.
Installing the Mac Migration Assistant
Your Mac includes the main Migration Assistant application, but you'll also need to install a helper application on your Windows PC.
In order to correctly configure Eventuate Local, you must set the OS environment variable DOCKER_HOST_IP. Install docker for mac.
Using the Mac Migration Assistant
- Before proceeding with the migration process, turn off the automatic Windows Update. There's a remote possibility that if the Windows Update starts installing new packages, the Migration Assistant will be interrupted, and won't be able to complete the process.
- Once you download it to your PC, launch the Windows Migration Assistant installer and follow the onscreen instructions to complete the installation.
- When the installation is complete, the Migration Assistant will auto-start.
- When the Migration Assistant launches on your PC, click through the welcome screen, until you're asked to start the Migration Assistant on your Mac.
- Launch the Migration Assistant, which is located at /Applications/Utilities, or from the Go menu, select Utilities.
- The Migration Assistant may ask you to enter the name and password of a user with an administrator account. Click Continue, enter an admin name and password, and click OK.
- The Migration Assistant will display options for the source of information to copy to your Mac. Depending on the specific version of the Migrations Assistant you are using, you should see either an option to select: From another Mac, PC, Time Machine backup, or other disk, or an option to select From a Windows PC make the appropriate selection and click Continue.
- The Migration Assistant will display additional source options. Select From another Mac or PC, and click Continue.
- In order for the Migration Assistant to continue, it must close any other applications that are running on your Mac. Click Continue to close any open apps and proceed with the migration process.
- The Migration Assistant will scan your local network for any PC or Mac that is running the Migration Assistant application. Your PC's icon and name should display in the Migration Assistant window. When it does, click Continue.
- The display will now show you a multi-digit passcode. Write this number down, and take it to your PC.
- The Migration Assistant will display a passcode. It should match the one that was shown on your Mac. If the passcode matches, click Continue and then return to your Mac.
- The Migration Assistant will display a list of items you can migrate to your Mac. The list will include the PC's currently logged-in user account, and all associated data, such as Music, Pictures, Movies, Desktop items, Downloads, Documents, Contacts, Bookmarks, and User Settings. The Migration Assistant can also copy additional files, such as shared files, logs, and other files and documents it finds on your PC.
- Select the items you wish to copy, and click Continue.
- Both Migration Assistants will display the ongoing progress of the copy operation. Once the copying process is complete, you can quit the Migration Assistant application on both machines.
The Migration Assistant can only copy the user data from the account that is currently logged in on the PC. If there are multiple user accounts that you wish to copy to your Mac, you'll need to log out of your PC, login with the next account, and then repeat the migration process.
When you buy a new Mac you likely want to transfer all of your data and applications from your current Mac to a new Mac. Here are instructions on how to accomplish this migration using a current Time Machine backup of your current Mac. I’m going to provide instructions for two different scenarios.
If you’re just taking your new Mac out of it’s box and turning it on for the first time follow the instructions in Scenario 1 – Setup Assistant. Alternatively, if you’ve already turned on your new Mac and created a user account then follow the instructions in Scenario 2 – Migration Assistant. Scenario 1 – Setup Assistant Important Note: When you turn on your Mac for the first time, you’ll be asked a series of setup questions.
These questions are presented by Apple’s Setup Assistant. The exact questions have varied across different versions of the Mac operating system. I can’t list every variation in this article so these instructions will be more general and not precise, step-by-step instructions. Preparation Make sure you have an up-to-date backup of your current Mac, by doing the following. Click on the Time Machine icon near the clock. Read the first two lines which tell you when the most recent backup was performed. Ideally, it would read something like “Latest backup today at 11:32 am” Look at your external backup hard drive’s ports to see if you’re connecting it to your Mac using a USB or Firewire cable.
Look at your new Mac to see what types of ports it has. You might need an adapter to connect your external, backup hard drive to your new Mac. If you store your Time Machine backup data on a Time Capsule then you don’t need to worry about connectors since your new Mac will connect to the Time Machine via your network. If your backup drive has a USB port then you should have a pretty easy time connecting it to your new Mac since all Macs have USB ports.
However, if you bought a Mac that has USB-C ports, then you’ll need either or an. If your backup drive has only a FireWire port then you’ll definitely need an adapter since Apple stopped including FireWire ports on new Macs around 2012. If your new Mac has a Thunderbolt port on it then get a If your backup drive has both FireWire and USB ports, I’d suggest you switch and use the USB port. If your new Mac has only USB-C ports then it would be easiest for you to switch to using an external backup drive that has USB port on it. Use this USB-external drive to backup your current Mac and then use an or an to connect your backup drive to your Mac. Migration or Transfer. Take your new Mac out of it’s box and turn it on.
Turn on its bluetooth wireless keyboard and mouse, if it has these peripherals. Plug an ethernet cord into the back of your Mac, if you use one. Connect your backup hard drive to your new Mac. If your backups are stored on a Time Capsule then your Mac will find the backups once you connect your Mac to your wireless network, which you’ll be prompted to do by the Setup Assistant. Keep reading. The Setup Assistant will display a series of questions.
For example, it commonly starts by asking you to select the type of keyboard you’re using and your preferred language. You will be asked to connect your Mac to your wireless network. You will be asked if you want to transfer data from another Mac or a backup of a mac.
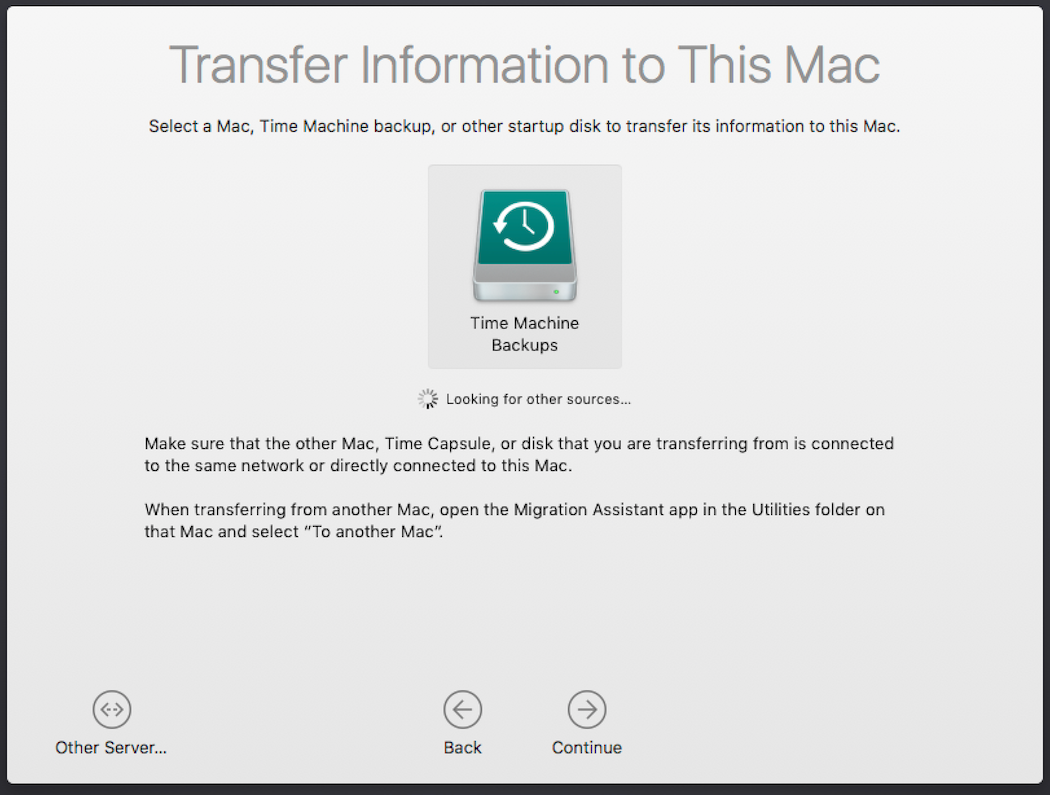
Select this option. Your new Mac will indicate that it’s looking for sources that contain Time Machine backups. It should detect either your external hard drive or your Time Capsule. Select your desired backup source and then click Continue. Follow the prompts to select all of your data and applications and start the transfer.
Sit back and be patient. This transfer can take hours depending upon how much data you have and the speed of your backup hard drive or network.
I often start a migration at the end of the day and let it run overnight. When the migration has finished, the Mac will likely restart on it own. Post-Migration. A cursory examination will be performed of the applications that you transferred onto the new Mac. This examination could identify some old, incompatible applications. If any are detected, they will be disabled and you will be notified. The Setup Assistant may ask you some additional questions about whether you want to enable various services and/or sign in to iCloud using your AppleID account.
Answer these questions as you prefer. At this point, the Mac should be ready for you to use. You can login to your user account and begin to test its applications and install appropriate updates.
Scenario 2 – Migration Assistant If you’ve already turned on your new Mac and created a user account Migration Assistant then you’ll need to follow a slightly different process. Note: You may also want to refer to. Preparation Follow the instructions listed in the Preparation phase of Scenario 1 – Setup Assistant. At the end of this preparation stage your backup hard drive, containing a recent backup of your current Mac should be connected to your brand new Mac. Migration or Transfer. Turn on your Mac and login to the user account that you previously created.
Open the Migration Assistant application which you’ll find inside the Utilities folder which is located inside the Applications folder. Follow the Migration Assistant’s prompts and select the option to transfer data from another Mac or a Time Machine backup. The exact prompts have varied across different versions of the Mac operating system. I cannot list every variation in this article so these instructions will be more general and not precise, step-by-step instructions. Your new Mac will indicate that it’s looking for sources that contain Time Machine backups. It should detect either your external hard drive or your Time Capsule.
(If it does not see your Time Capsule then make sure your new Mac is connected to your home network.). Select your desired backup source and then click Continue. Follow the prompts to select all of your data and applications and start the transfer. If the user account name that you created on your new Mac matches the user account name on your current Mac then Migration Assistant will ask you if you want to keep both accounts or let the user account from the current Mac replace the account you created on your new Mac when you took it out of the box.
The choice is yours. The safe thing to do is to keep both accounts but if you haven’t created any data in your new account then you could replace it. Sit back and be patient. This transfer can take hours depending upon how much data you have and the speed of your backup hard drive or network.
I often start a migration at the end of the day and let it run overnight. When the migration has finished, the Mac will likely restart on it own. At this point, the Mac should be ready for you to use.
You can login to your user account and begin to test its applications and install appropriate updates. Was this tip helpful?