Pololu Maestro Control Center For Mac
This Python class supports Pololu's Maestro servo controller over USB serial. Great for use with the Raspberry Pi, but works with Windows too.
Micro Maestro power pins. Micro Maestro configured to use a single power supply for both board and servos. The Channel Settings tab in the Maestro Control Center. And internal scripting • 0.a for details) • A. The Maestro is not compatible with any version of Mac OS.
The class includes methods to control servos (position, speed, acceleration), read servo position, and start/stop Maestro scripts. See Pololu's on-line documentation to learn about the full capabilities of this nifty micro-controller.
Setup
Pololu's Maestro Windows installer sets up the Maestro Control Center, used to configure, test and program the controller. Be sure the Maestro is configured for 'USB Dual Port' serial mode, which is not the default.
You'll need to have the 'pyserial' Python module installed to use maestro.py.
If you have pip available, pyserial can be installed as follows:
Using google chrome on mac. or, for python3
Alternatively, you can download pyserial-2.7.tar.gz from http://sourceforge.net/projects/pyserial/files/pyserial/
and then install
Check out http://pyserial.readthedocs.io/en/latest/pyserial.html#installation for other install options.
To download the maestro.py module issue the following command:
How to Use
Example usage of maestro.py:
There are other methods provided by the module. The code is well documented, if you'd like to learn more.
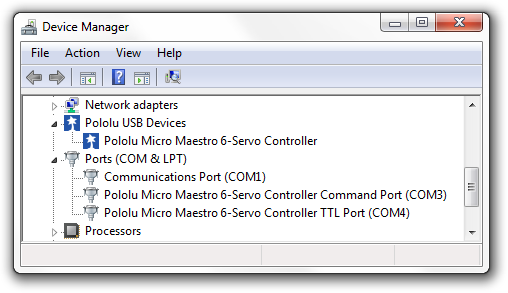
For use on Windows, you'll need to provide the COM port assigned to the Maestro Command Port. You can identify the port by starting Device Manager and looking under Ports (COM & LPT). Here's how to instantiate the controller for Windows for COM port 3.
Permission issue
If you find that Linux complains about permissions trying to access the ttyACM device, just add your user to the 'dialout' group by issuing the following:
You'll need to reboot for the change to take effect.
Going Further
The Maestro series of controllers can support much more than just servo control. The PWM-based protocol used to control servos is also compatibile with RC Electronic Speed Controllers (ESCs) to control motor power and direction. There are many motor controller options available for both brushed and brushless motors.
Beyond servo and motor control, the Maestros can also be used for digital inputs, digital outputs and analog inputs. The setTarget and getPosition methods support setting and reading values for these extended features. You do, however, need to use the Maestro Control Center to change the mode of individual channels from 'servo' to either 'input' or 'output'. Read the Maestro documentation on how to properly use these special modes and wire them properly.
I've found that the many capabilities of the Maestro lends itself nicely to robotics. If you're interested in some robotic applications check out Basic PiBot. Its a simple framework to get you started with making your own interactive and/or autonomous machines. The maestro has proven to be rock solid in this applications.
Maestro.py This Python class supports Pololu's Maestro servo controller over USB serial. Great for use with the Raspberry Pi, but works with Windows too. The class includes methods to control servos (position, speed, acceleration), read servo position, and start/stop Maestro scripts. See Pololu's on-line documentation to learn about the full capabilities of this nifty micro-controller.
Setup Pololu's Maestro Windows installer sets up the Maestro Control Center, used to configure, test and program the controller. Be sure the Maestro is configured for 'USB Dual Port' serial mode, which is. You'll need to have the 'pyserial' Python module installed to use maestro.py. If you have pip available, pyserial can be installed as follows: python -m pip install pyserial or, for python3 python3 -m pip install pyserial Alternatively, you can download pyserial-2.7.tar.gz from wget and then install tar –zxf pyserial-2.7.tar.gz cd pyserial-2.7 sudo python setup.py install Check out for other install options.
To download the maestro.py module issue the following command: wget How to Use Example usage of maestro.py: import maestro servo = maestro.Controller servo.setAccel(0,4) #set servo 0 acceleration to 4 servo.setTarget(0,6000) #set servo to move to center position servo.setSpeed(1,10) #set speed of servo 1 x = servo.getPosition(1) #get the current position of servo 1 servo.close There are other methods provided by the module. The code is well documented, if you'd like to learn more. For use on Windows, you'll need to provide the COM port assigned to the Maestro Command Port. You can identify the port by starting Device Manager and looking under Ports (COM & LPT). Here's how to instantiate the controller for Windows for COM port 3.
Import maestro m = maestro.Controller('COM3') Permission issue If you find that Linux complains about permissions trying to access the ttyACM device, just add your user to the 'dialout' group by issuing the following: sudo adduser $USER dialout You'll need to reboot for the change to take effect. Going Further The Maestro series of controllers can support much more than just servo control. The PWM-based protocol used to control servos is also compatibile with RC Electronic Speed Controllers (ESCs) to control motor power and direction. There are many motor controller options available for both brushed and brushless motors. Beyond servo and motor control, the Maestros can also be used for digital inputs, digital outputs and analog inputs. The setTarget and getPosition methods support setting and reading values for these extended features.
You do, however, need to use the Maestro Control Center to change the mode of individual channels from 'servo' to either 'input' or 'output'. Read the Maestro documentation on how to properly use these special modes and wire them properly. I've found that the many capabilities of the Maestro lends itself nicely to robotics. If you're interested in some robotic applications check out. Its a simple framework to get you started with making your own interactive and/or autonomous machines. The maestro has proven to be rock solid in this applications.